With Orochi Labs now open, it seems high time to fill the esoteric ether with the ramblings of deranged raiders - now let’s go play with tentacles! This guide will cover the mechanics of the fight from Story to Elite 5.
(I’m not quite sure, but it might have come from Manchester.)
What to bring
Towels won’t help here, I’m afraid. To queue, all groups must have 2 tanks, 2 healers and 6 dps, or form a private team.
Story Mode - Have enough HP and protection to survive the birds, as they’re the highest incoming damage here. Otherwise, roles and mechanics are flexible.
Elite 1 - Tanks must bring a taunt of some form. Manticore Agitator is the gadget, and there are several skill-based taunts to use in tanking weapons. If tanks are sustain, healers can go dps.
Elite 5 - In addition to E1 requirements, it’s highly suggested to bring some form of slow to use on the Titans that will spawn. This should be carried by the Filth Placer, ideally an AR user.
Stage 1
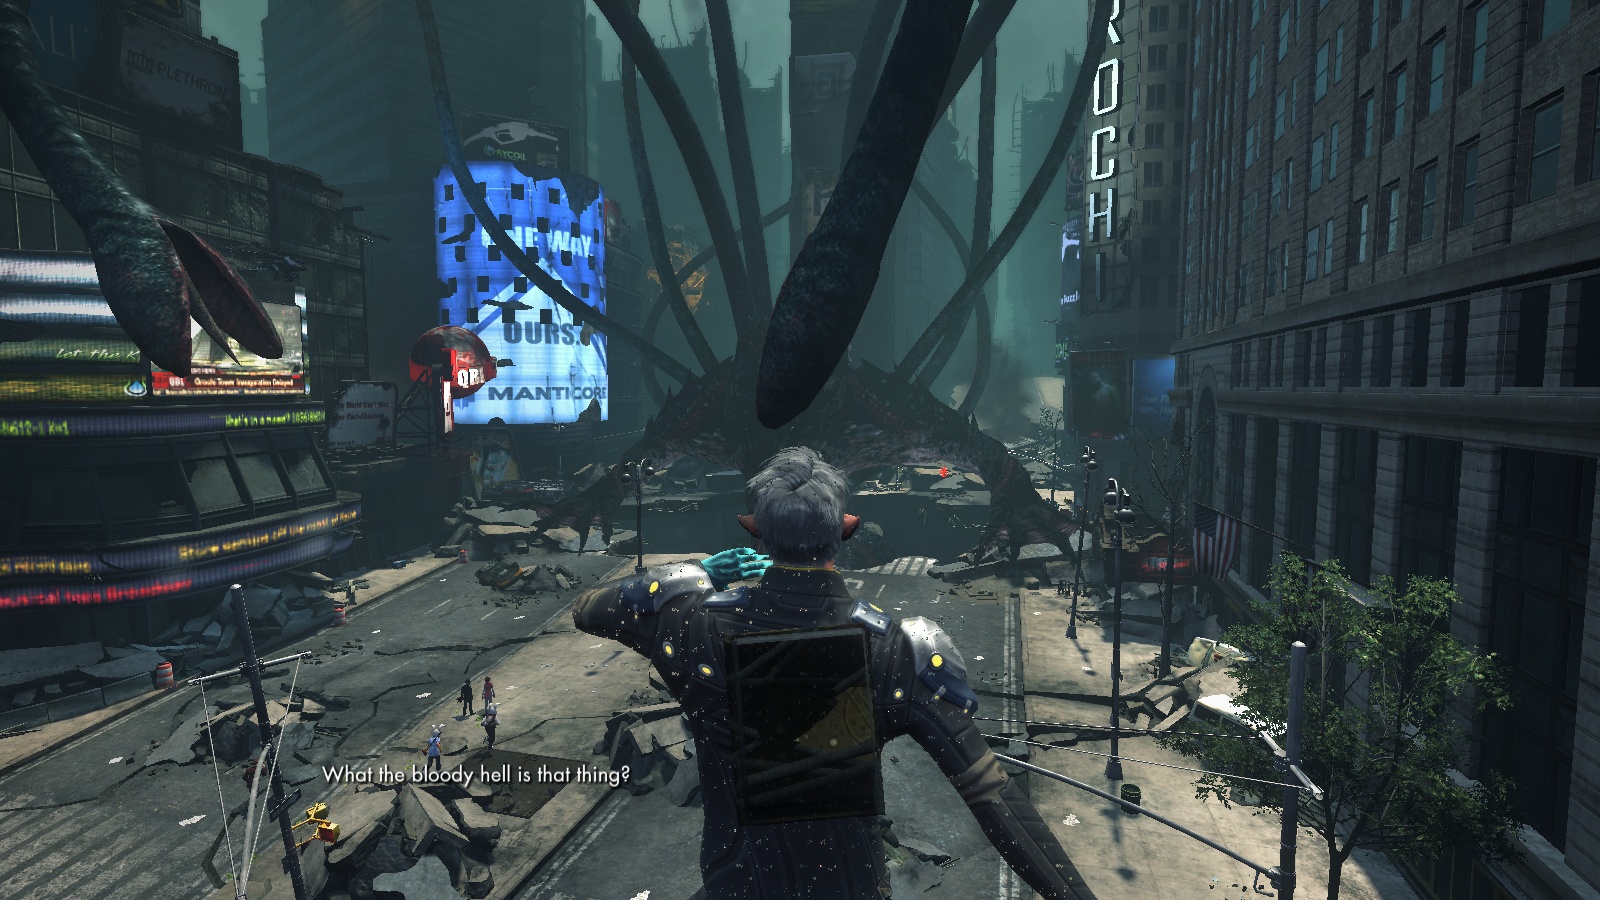
Beginning at the entrance of the train station, players will pass through several amusing dialogues as they wind their way through the wrecked trains and out into the sun - leaving the trains puts players into swarms of filthy civilians and a few dogs before you make the roof of the parking garage, where a pair of Zero-point birds will swoop down. Make your way through the QBL broadcast (cameramen are nuts) and jump down to confront the Unutterable Lurker.
You only have to do this in Story Mode, as later difficulties place parties directly before the Lurker.
Elite 5 note:
If all players are in melee range to the Lurker, a cast called Personal Space will be triggered. It’s a massive AoE that will likely wipe the majority of your team. Keep one person outside, range attacking or healing and placing filth to avoid triggering PS. If the Filth Placer becomes pod target, someone else must step away or PS will trigger.
First things first: on any mode you’re on, the Lurker will throw puddles of filth at a player who is past the metal grate directly in front of him. If a player is further than the grate, they will wind up placing filth - mistakes are not such a big deal in Story Mode, as they will vanish after a time. Still, it’s not good to place near people.
In E1, filth drops off much slower, and presents a much greater danger. By E5, consider your filth mistakes permanent, and your team requires a Filth Placer at all times to ensure you don’t get filthy puddles in bad places.
The Lurker will throw filth as its opening move, after Shadow out of Time and shortly after slamming down his fist every second time.
Tank note:
Once you’ve pissed the Lurker off, you’ll be attacked by Whisper of Darkness - this counts down from 40 stacks, damaging you severely the whole time. If you still have aggro when Whisper reaches 0 stacks, you will die. At around 10 stacks, typically, the second tank will activate a taunt and take aggro, repeating the process the entire fight.
In SM, Whisper stacks automatically swap before 0, so no special mechanics are required.
Fighting the Lurker close comes with its own set of hazards - players must dodge from side to side to avoid his colossal falling fists or risk… boo boos, if you’re in SM. Oneshots for any difficulty later.
Additionally, the big tentacle monster has a tentacle attack!
From time to time, the Lurker will cast Beneath you it Devours, which will target a player for consumption by a tunneling tentacle coming from the back of the arena. The pod target will get a red crosshair icon over their head, and the pods will chain a fair distance to other players. Once podded, your team must kill the pods to free a player. Ranged DPS simply turn while remaining on the grate. Melee typically ignores them and keep beating on the boss, as there’s too much travel time between targets.
After the pod is cast, any player can intercept it and either be consumed or quickly dodge back once a white cast circle appears from the burrow.
Elite 5 note:
Take your pod. If it’s on you, accept your fate and don’t pod other players.
Pod target - Lurker thought MineJas looked tasty! Calling out the pod target on voice can help.

At all difficulties, players should ideally take the pod around a small manhole behind the group in order to stay in range for DPS.
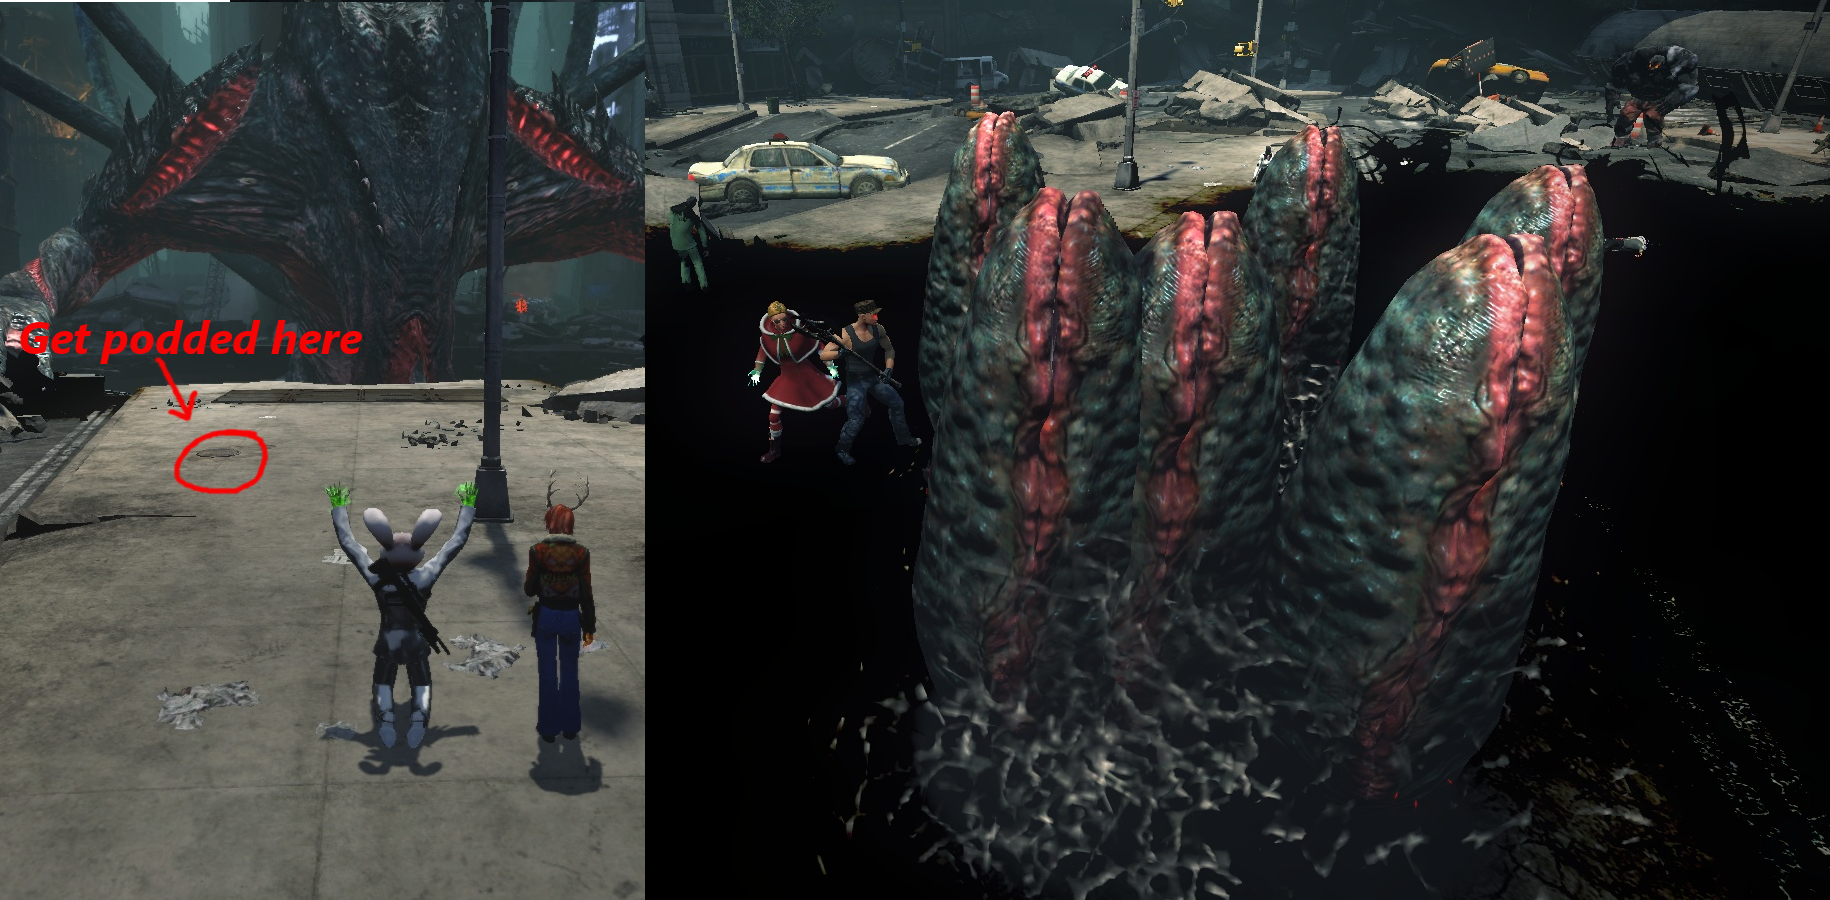
Podding target, and why you don’t stand near the pod target. Bad things happen…
After enough damage is sustained, roughly 25% of initial HP, the Lurker has had enough and will cast Shadow out of Time - this is your cue to gtfo and hide behind some rubble; the further you can get the better, as areas within ~20+ meters will become covered in filth after the wave passes. (If you are hit by the wave you receive damage, a knockback and a debuff to heals received - don’t kill yourself trying to hide.)
Elite 5 note:
The wave from SooT will also place a 30s damage reduction debuff on you, which lasts just long enough to make you largely useless on the first Titan.
After each wave, swarms of filthy humans will emerge from the back corners and attack your party - they can be easily cleaned up and are more annoyance than anything. Additional adds spawn on the first wave and typically bum rush a healer - AoE ‘em.
Stage 2
After the dust settles from the first wave, Flappy Jr. makes its descent, starting first near the rear police car, then in front-right of the middle rubble pile. Aside from hitting fairly hard, they cast Downfall, a massive cone frontal, and explode over a very big area when they die. There’s a tank for each of the birds - once the first dies, another SooT begins casting and DPS can either quickly burn the 2nd before it launches, or get away and allow the tank to hide without cleaving them.

Like I said, they make a big boom when they die. Watch out you don’t trip on a pebble whilst running gallantly away.
After the first two birds and wave are cleared, the third Flappy Jr. will land in the front-left of the middle rubble piles. Kill, repeat a wave.
Final bird lands in the same position as the first, leading to the last wave before returning to confront the boss. If you happen to wipe once Flappies are initiated, their starting positions will change, but the rotation remains the same.
Elite 5 note:
You will get one less Flappy Jr. to fight, but you’ll also get three new adds to fight - Filthy Titans. These are your priority over everything else going on in the raid. Titans MUST die before SooT comes, or they get even meaner… as do your Filthy Civilians, which become Abominations. Titans will resurrect filthy civvies - kill Titans first.
Your new big buddies come with two casts - a ranged filth circle and a close range AoE smash. While both are impairable (and should be!), both have a tendency to complete the cast regardless. Don’t stand in it.
Until your Titan has done two casts, it will do no damage with basic attacks. Tanks can taunt on the second cast or earlier. One tank entertains the bird away from the groups as the second tank and the rest of the party kill the Titan first.
When your e5 group reaches the third and final bird, it is VERY important that you DO NOT kill Flappy Jr. immediately. If you instead wait for it to cast three Downfalls - or hit the 6 minute mark, whichever occurs first - before killing it, your raid will skip one SooT, which means one less Titan and that much more DPS time.
You’ve got plenty of time here, Chuck! Why not practice your dance for the stage?

Achievement note: During the third bird also is the ideal time to try for an achievement, “Stay Dead…Or Not,” if your group is comfortably downing the raid.
Instead of killing the 3rd Titan, the tank will take it away and survive while the dps instead focus on killing the filthy civilians and soldiers… over and over. When one reaches 10 stacks of Blasphemous (Titan keeps resurrecting them), you can kill the Titan and adds, clear the raid as normal and get your “Big Trouble” title.

Elite 5 tank:
The tank who fought the third Titan has nothing to do while the party is waiting to kill the third bird. Go ahead and look for an opportunity to move up to the Lurker during this time, so you are in position well ahead of time.
Stage 3
At this point, there’s a lull in the fighting as the Lurker casts his first filth - DPS should hang back behind the lamppost until filth is cast so as not to place it in the fight. Tanks should use the opportunity to push ahead and try to get to the Lurker before anyone else.
Tank note:
You want to be getting as close to the Lurker as you can after the last bird. The police car and rubble by the Lurker’s left fist (facing it, your right) are the typical ways to creep up. Watch for filth movements after the wave and reach the boss before DPS - aggro has been reset.
The 1~2 meters directly in front of the Lurker, though covered in cosmetic filth at this time, will not damage players. Past that it will.
This is the closest you can get to the Lurker while still hiding from the wave. Jump over the rubble and dodge roll towards the Lurker immediately after SooT to avoid potential filth. Past the grate, filth is purely cosmetic near the boss.

After a few seconds, coming in before the adds from the last wave, come your buff trio to place a trio of circles you very much want to stand in - 4 players to a buff circle, and remember to stand on the grate. The tank without aggro can stay out of the front buff so as to free up a spot and not take aggro before time.
From this point on, it’s rinse and repeat for damaging the Lurker and then standing aside from a SooT and clearing adds before resuming the fight.
Elite 5 note:
Remember the Titans! Lurker becomes priority #2 for ranged DPS, though melee can keep attacking for a bit. Use of gadgets to slow the Titan down or kick it back off the group can help, but it simply needs to die. Fast.
Guage your raid’s DPS to determine if a lower DPS raid should pull the first Titan into the buff circles to be burned down or if your Filth Placer should kite it while the raid burns down the Lurker for the higher DPS groups.
Loose Titans - and Abominations - wreck DPS.

When the Lurker is down to its last speck of health - approximately 10% - it will cast Final Resort, which is almost always faster than your little legs can run. Be ready to back off as it reaches 10% or so, and then jump back to finish the job - or burn it down like champions.

As Zuberi might say, “well done!”